
I shoot Sony cameras. Right now that consists of a Sony A77 and a Sony A550 as my backup camera. There's a few things inside Sony cameras which sets them apart from others; most notably is what is called "DRO", basically it stands for "Dynamic Range Optimization". It is basically leased technology from a company named Apical and Nikon uses their technology as well, the difference however is that Nikon, unlike Sony, didn't provide them a "chip" which from my understanding basically fine tunes things. Now I know, this is really in the weeds stuff here but hang with me.
Now I imagine most photographers workflow these days consists of basically this;
*Download photos to computer
*Open Lightroom
*Import photos
*Process
*Maybe touch up in Photoshop
*Save
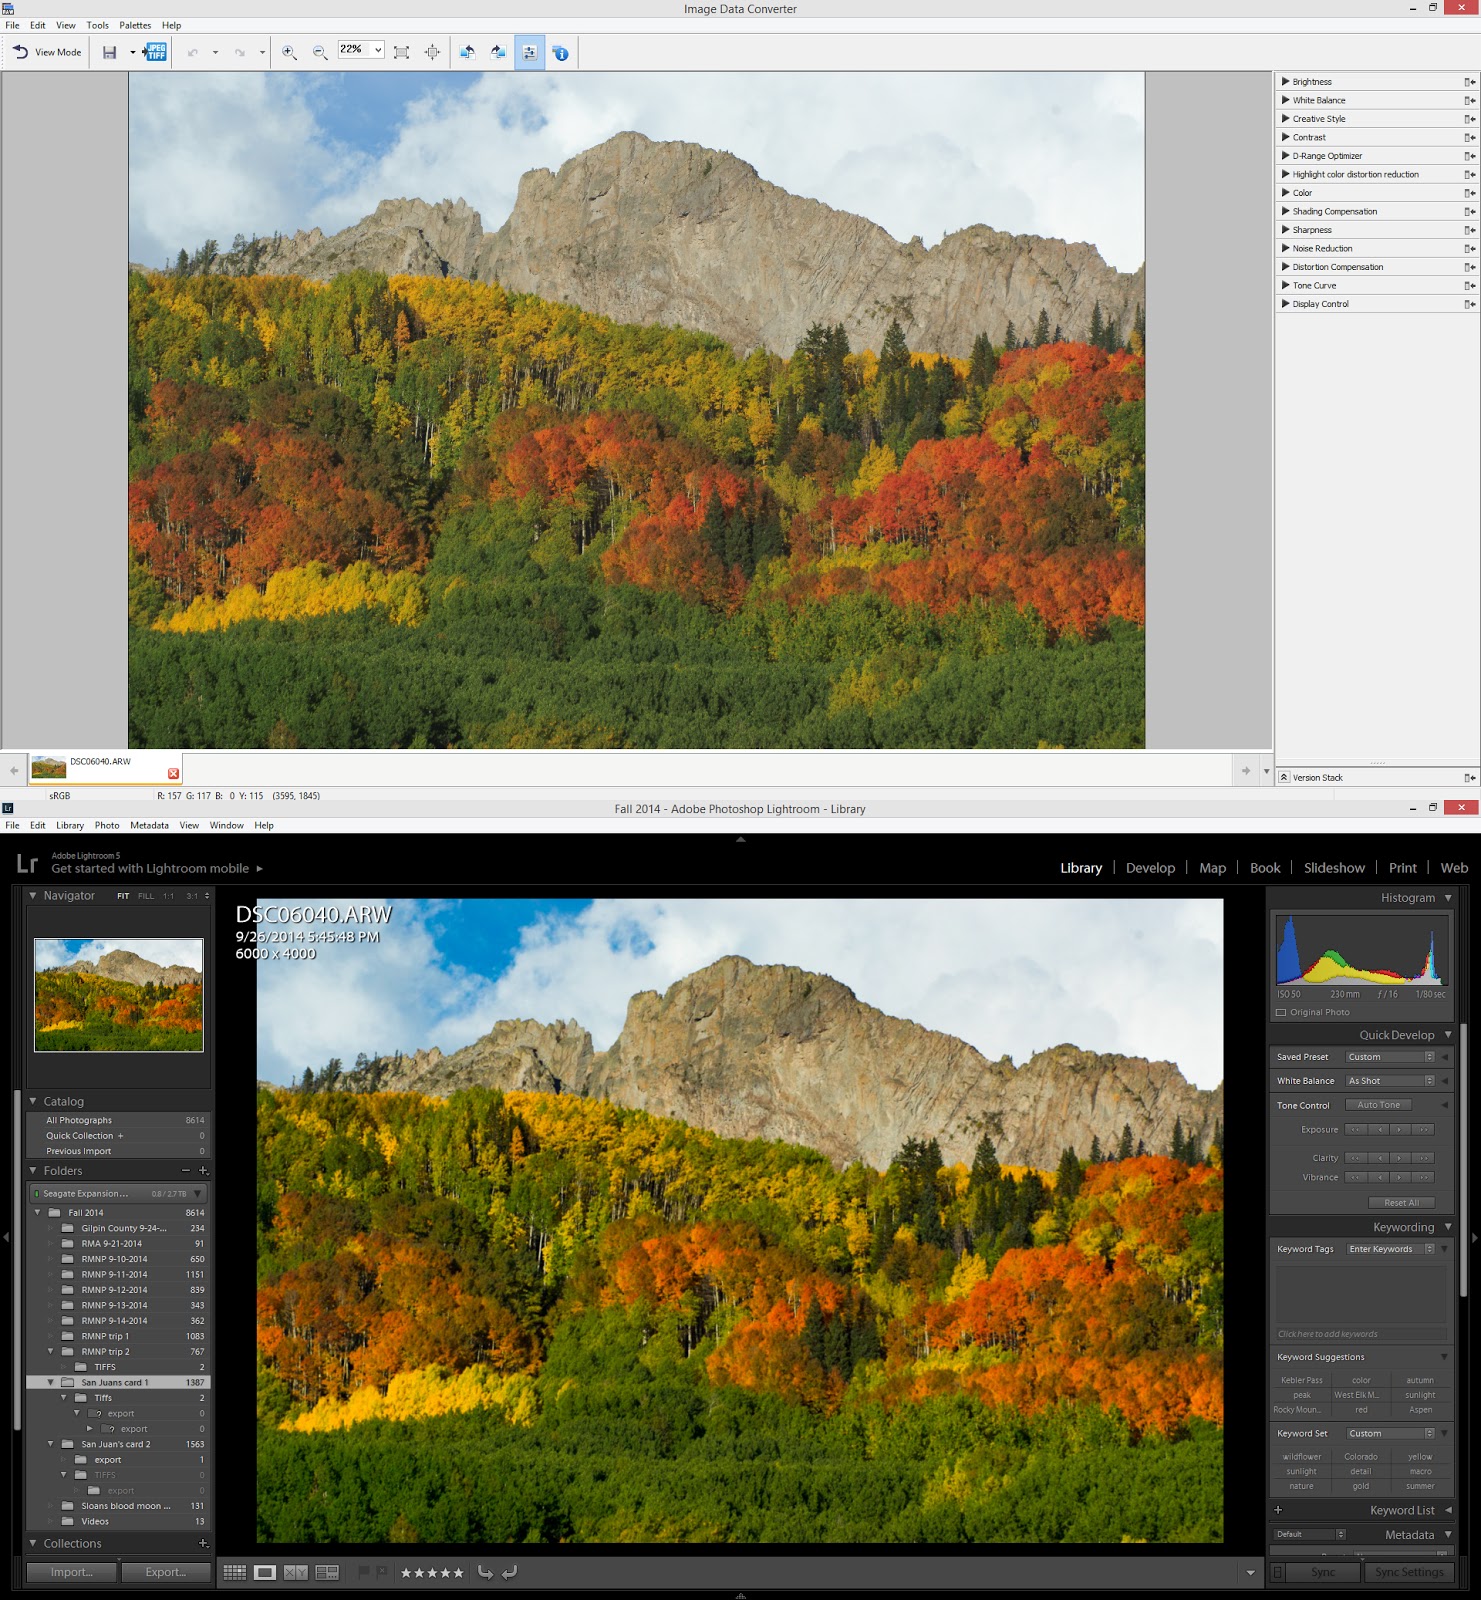
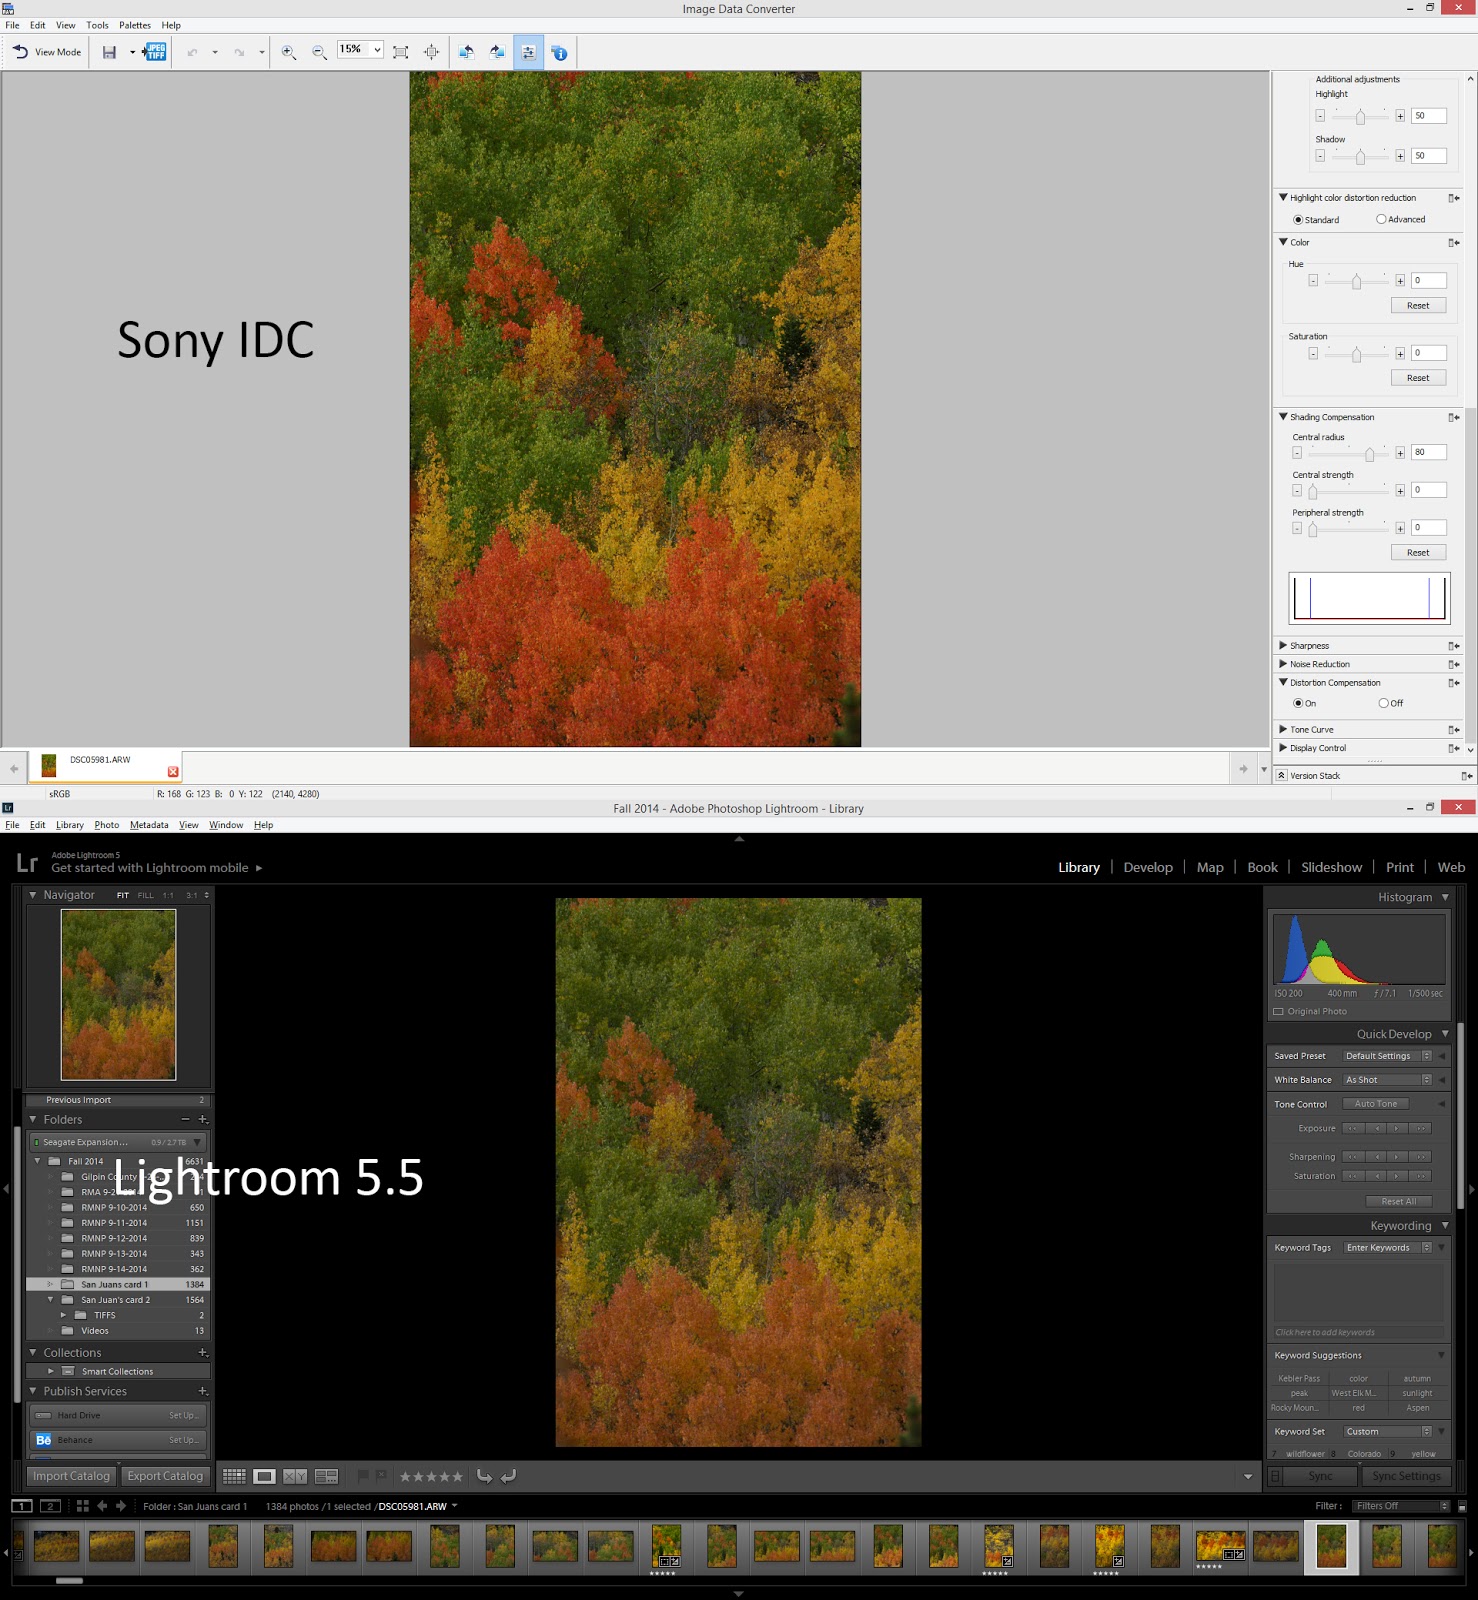
That "open in Lightroom" thing though got me. It got me good. When I did this, I noticed right away a complete loss of color and luminescence. I've always noticed it before but it was really never that big of a deal. However for these photos it was. Gone was the "shimmering effect" the Aspen once had and how they glowed. Lightroom was essentially zeroing out every single thing as far as settings went with my RAW files. Flat out, it wasn't reading the information embedded into the RAW files as far as creative styles go or anything as far as DRO went. What I would see on my cameras LCD would look very different than what I saw when I imported them into Lightroom. No, I don't shoot RAW+JPEG, only RAW. I couldn't figure out why this happening so I went digging. I found a few threads here and here over on dpreview and flickr which touched on this happening but not a whole lot and then I saw someone mention "Sony IDC". A light bulb went off.
Like most photographers, the software that comes with our cameras we sort of consider "just there". In fact, I would think most never even bother to install the stuff. After all, we have the latest and greatest software from Adobe. Who needs factory junk which hardly has anything included in it, right? Right. Well....no, not right, in fact....very wrong. I opened up Sony IDC just to see what would happen, expecting nothing at all and just the same thing really. Boring software and no real fine tuning tools. Boy, did I get a shock. Right away I noticed a huge difference. We're talking massive. Everything that was recorded from the time of capture in my camera was retained in full. Everything. All the luminosity was there, the fine detail with the DRO, the shimmering of the Aspen and their colors when I saw them. All there. All retained. Needless to say I was rather elated and excited.
Since finding this out I have redone my workflow entirely and now use Lightroom as a more of "in the weeds" app that my go to app for editing. My workflow used to look like this;
*Import photos into Lightroom
*Process in Lightroom
*Export out as a 16 bit TIFF
*Final editing in Photoshop
*Done
My workflow now looks like this;
*Import RAW files into Sony IDC
*Fine tune exposure, DRO, camera settings
*Save RAW file & export out as 16 bit TIFF
*Open in Photoshop to edit, save TIFF file
*Open TIFF file in Lightroom and do in the weeds editing and keywording
It sounds like it would take more time doesn't it but in reality it has allowed me to really cut down on the time to edit photos. I no longer have to mess around with trying to get back color from color shifting or retaining DRO which was basically futile. That being said.....
Not without caveats.
There are some caveats when it comes to editing in Sony IDC and one has presented a real problem which I'll explain. There is a work around for this but it is kind of intensive and unless you know some things inside Photoshop (Lightroom is incapable of helping here) you may have some problems. It's times like this sites like YouTube come in very handy with video tutorials.
Sony IDC has issues when it comes to 16 bit TIFF files and I haven't quite figured out why. It may be in the way the files are written themselves and I really need to contact Sony about this and thus far I have never heard this mentioned anywhere. Basically, when you export out a RAW files as a 16 bit TIFF, dithering can occur in skies. It's rather odd considering this shouldn't be happening at all and is basically 8 bit behavior and what you would find with JPEG images and as far as I'm able to tell, it only seems to happen in skies.
The work around.
I don't worry about how the skies look inside Sony IDC. Instead, what I do is now process the skies inside Lightroom. Things like DRO and camera settings don't matter much when dealing with a sky. I then export out that image from Lightroom to a 16 bit TIFF file. Inside Photoshop I use layer masking to bring that sky from Lightroom on to the other photo that was processed inside Sony IDC. Problem solved. This allows me to get the exact image I am looking for without the massive loss in quality due to dithering. Intensive? Perhaps. It doesn't take a lot of time however and I believe it's very much worth it. If you aren't familiar with how to use layer masks, simply Google or YouTube it. It's extremely easy and one of the most powerful editing tools in post work. One you use them, you'll always use them.
The screen shot below is a really drastic illustration of what I am talking about. I was frustrated and was fighting with retaining DRO and adjusting the color shift inside Lightroom. I tried and failed to replicate what I saw in camera. As you can see, the oranges in the Aspen trees is basically toast, gone, as is the dynamic range from DRO which was recorded inside the RAW file from the time of capture. I opened it up in Sony IDC and there it was....all retained. The finished photograph is done using my workflow above (not the layer masking part of course as there is no sky).
In closing, those of you who shoot Sony may want to take a minute and take a look at your RAW files inside Sony IDC. It's a pretty huge difference and one that I think will probably surprise you.
It's worth the 5 minutes for sure. Be sure to check out my website www.jdebordphoto.com and my facebook page https://www.facebook.com/jdebordphotography to keep up with my adventures behind the camera.
Yours,
John
 |
| Click for larger size |
 |
| Click for larger size |
Since finding this out I have redone my workflow entirely and now use Lightroom as a more of "in the weeds" app that my go to app for editing. My workflow used to look like this;
*Import photos into Lightroom
*Process in Lightroom
*Export out as a 16 bit TIFF
*Final editing in Photoshop
*Done
My workflow now looks like this;
*Import RAW files into Sony IDC
*Fine tune exposure, DRO, camera settings
*Save RAW file & export out as 16 bit TIFF
*Open in Photoshop to edit, save TIFF file
*Open TIFF file in Lightroom and do in the weeds editing and keywording
It sounds like it would take more time doesn't it but in reality it has allowed me to really cut down on the time to edit photos. I no longer have to mess around with trying to get back color from color shifting or retaining DRO which was basically futile. That being said.....
Not without caveats.
There are some caveats when it comes to editing in Sony IDC and one has presented a real problem which I'll explain. There is a work around for this but it is kind of intensive and unless you know some things inside Photoshop (Lightroom is incapable of helping here) you may have some problems. It's times like this sites like YouTube come in very handy with video tutorials.
Sony IDC has issues when it comes to 16 bit TIFF files and I haven't quite figured out why. It may be in the way the files are written themselves and I really need to contact Sony about this and thus far I have never heard this mentioned anywhere. Basically, when you export out a RAW files as a 16 bit TIFF, dithering can occur in skies. It's rather odd considering this shouldn't be happening at all and is basically 8 bit behavior and what you would find with JPEG images and as far as I'm able to tell, it only seems to happen in skies.
The work around.
I don't worry about how the skies look inside Sony IDC. Instead, what I do is now process the skies inside Lightroom. Things like DRO and camera settings don't matter much when dealing with a sky. I then export out that image from Lightroom to a 16 bit TIFF file. Inside Photoshop I use layer masking to bring that sky from Lightroom on to the other photo that was processed inside Sony IDC. Problem solved. This allows me to get the exact image I am looking for without the massive loss in quality due to dithering. Intensive? Perhaps. It doesn't take a lot of time however and I believe it's very much worth it. If you aren't familiar with how to use layer masks, simply Google or YouTube it. It's extremely easy and one of the most powerful editing tools in post work. One you use them, you'll always use them.
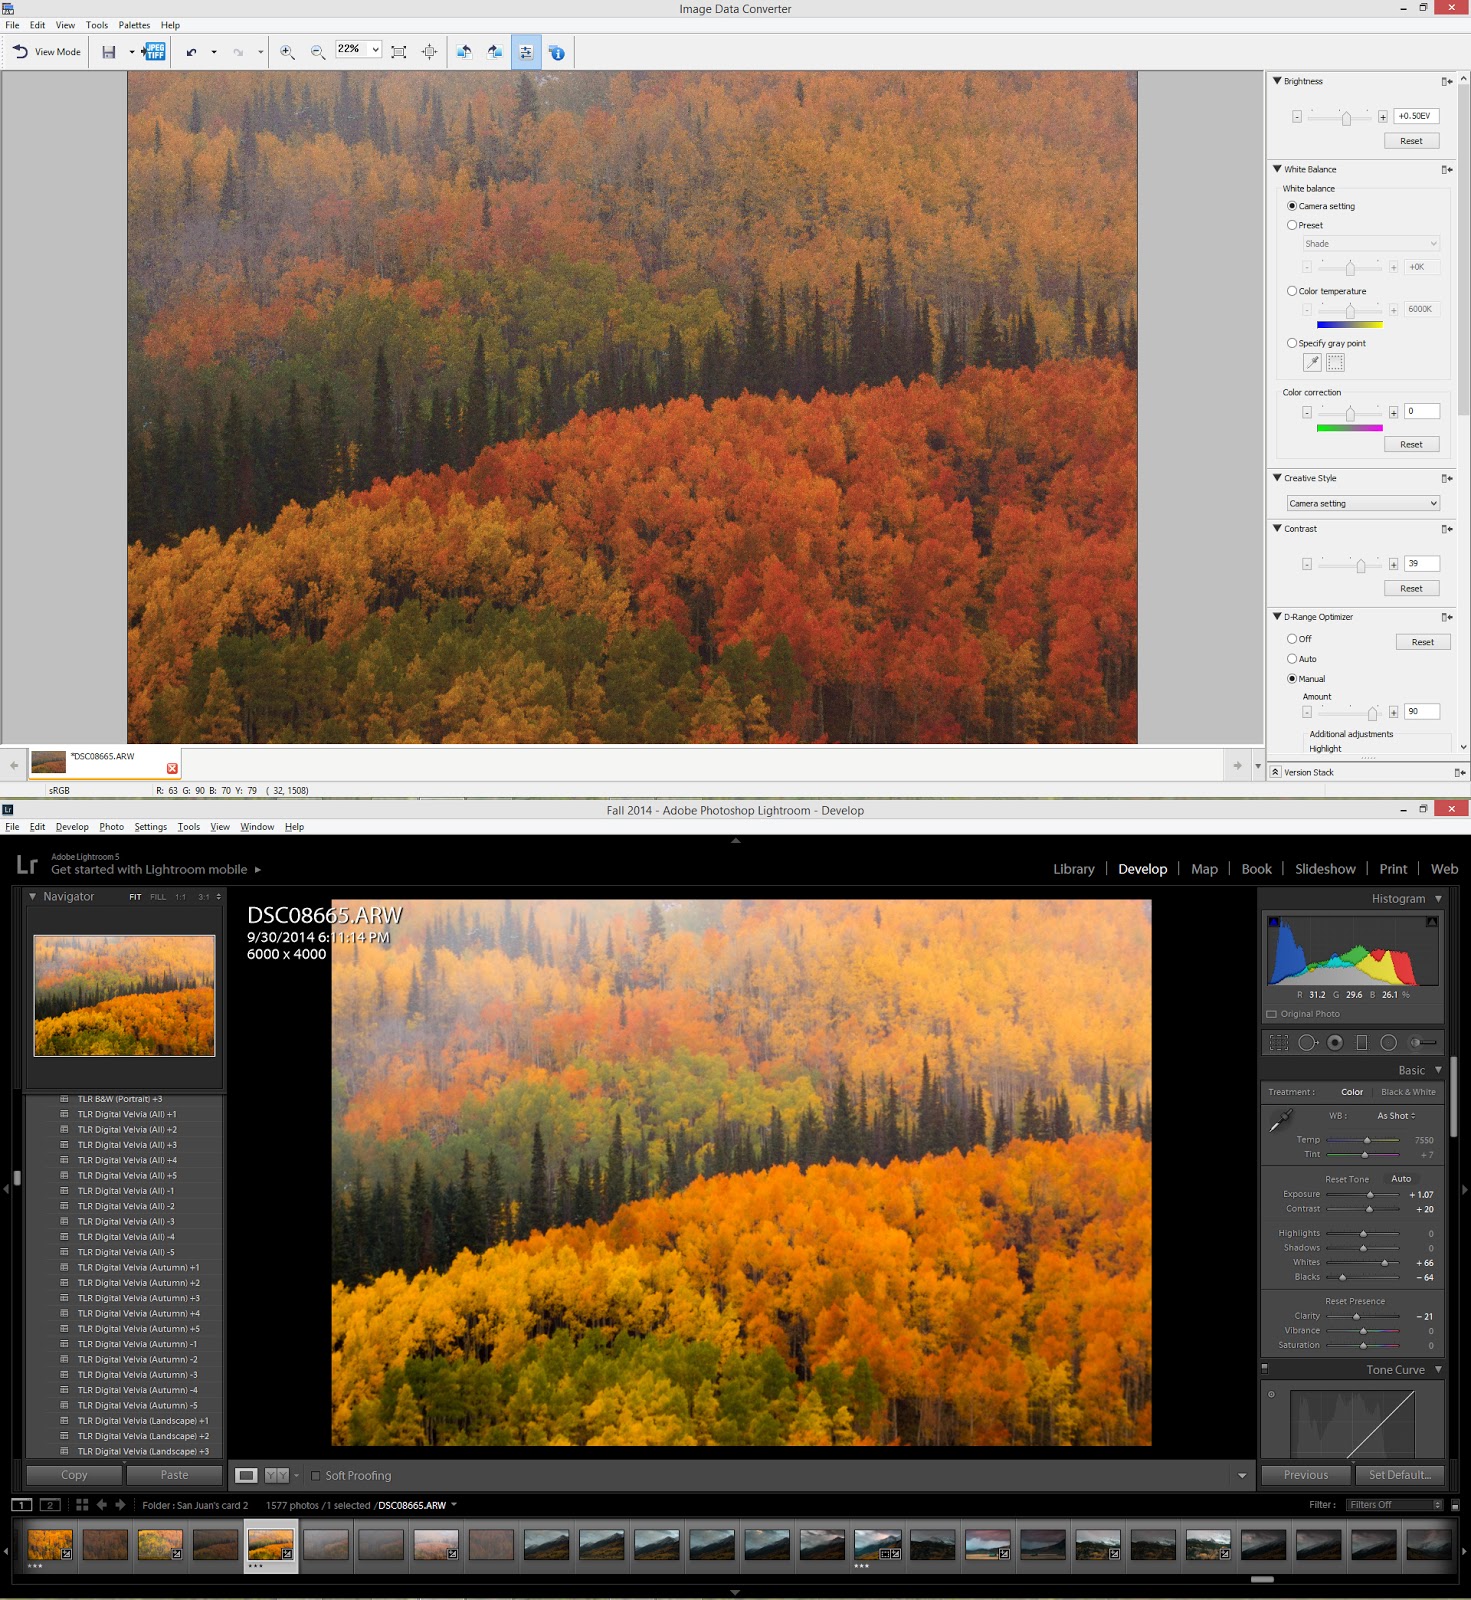
The screen shot below is a really drastic illustration of what I am talking about. I was frustrated and was fighting with retaining DRO and adjusting the color shift inside Lightroom. I tried and failed to replicate what I saw in camera. As you can see, the oranges in the Aspen trees is basically toast, gone, as is the dynamic range from DRO which was recorded inside the RAW file from the time of capture. I opened it up in Sony IDC and there it was....all retained. The finished photograph is done using my workflow above (not the layer masking part of course as there is no sky).
 |
| Click for larger size |
 |
| click for larger size |
In closing, those of you who shoot Sony may want to take a minute and take a look at your RAW files inside Sony IDC. It's a pretty huge difference and one that I think will probably surprise you.
It's worth the 5 minutes for sure. Be sure to check out my website www.jdebordphoto.com and my facebook page https://www.facebook.com/jdebordphotography to keep up with my adventures behind the camera.
Yours,
John


